Adding extra registration form fields
By default, OppiaMobile provides some basic user profile with some of the most common fields needed for an implementation. This includes first name, last name, email, or job title and organization the user belongs to. If there is a need to have some additional fields, there is a simple way to customize them.
The system allows the definition of three custom field types:
String values: for any kind of text form
Integer values, for numerical fields
Boolean values, for yes/no conditions, or a simple “License agreement”, for example.
Server
The profile custom fields can be edited dynamically from the user interface, so there is no change in configuration files needed.
This is done using the Django admin, so access it from the navigation bar (you have to be a user with admin rights) and go to the “Profile > Custom fields” ection. There you can edit the current ones, remove them or add new fields.

The Id field is the dictionary identifier for that field. Name it using the snake_case style, so for example, if you want to add a “Twitter username” field, you would name it
twitter_profile.The “helper text” field is used to define a explanatory text for that field that will be displayed on the form below the input.
The order value is used to control how the custom fields are ordered within the form.
Be careful with adding additional required fields for apps already deployed, since that could cause that a version of the app that doesn’t include that field in the registration form would not be able to submit new users, as the form would not be validated because of that missing field.
App
Once the server is ready to manage the custom fields, we need to configure them in the app. Right now this is done in the building process, so there is no way of dynamically edit the form fields once the app has been built. In future ersions of the app, the custom fields definition will be directly fetched from the server, but this process is needed anyway for a first definition and in cases where the app will work mostly offline.
The custom fields are defined in a file named custom_fields.json under the
assets folder. You have to update this dictionary with the proper syntax.
Here is an example of how that JSON would look like (reading the description of
server custom fields the example itself is pretty much self-explanatory):
{
        "fields": [
                {
                        "name":"custom_text",
                        "label":"Required field",
                        "order":1,
                        "required":true,
                        "helper_text":"....",
                        "type":"str"
                },

                {
                        "name":"custom_bool",
                        "label":"Boolean field",
                        "order":2,
                        "required":false,
                        "helper_text":"Check this to field",
                        "type":"bool"
                },

                {
                        "name":"custom_int",
                        "label":"Numeric field",
                        "order":3,
                        "required":false,
                        "helper_text":"....",
                        "type":"int"
                }

                // ...

        ]
}
The custom fields are loaded once per app version, so if you want to update the
custom fields definition of a previously installed app, you’ll have to update
the LOAD_CUSTOMFIELDS_VERSION build setting (see Settings and Defaults) to a
higher value. If the value is the same of the current app version, you’ll need
to update also your app versionCode in Gradle for this changes to be
reflected.
Note that the custom fields defined in the JSON will not add new fields defined but override the current definition with that one, so any field that is no longer there will be removed. This does not include the current values saved for the local users of the app, only the definition of what fields appear in the UI, so those values would be kept in the local database.
Choices field
Additionally to the fields definition, you can configure a special kind of
field where you only let the user select the value from a dropdown list of
choices. Currently this is definition is not included in the server, so
server-side it will be saved as a normal string value of the selected option.
To do so, you need to set the field type to choices, and associate it with a
collection defined in the collections section of the JSON dictionary.
Here is an example of how that JSON would look like:
{
        "fields": [
                {
                        "name":"custom_choice",
                        "label":"Custom choice",
                        "order":1,
                        "required":true,
                        "type":"choices",
                        "collection":"choicelist"
                }
        ],

        "collections": [
            {
              "collection_name": "choicelist",
              "items":[
                {"id": "choice1", "value":"Choice 1"},
                {"id": "choice2", "value":"Choice 2"},
                {"id": "choice3", "value":"Choice 3"},
                ...
              ]
            }
        ]
}
Conditional fields
You can also configure the visibility of a field to be dependant of another
field in the registration form. This is done adding a property named
visible_byfield in the field definition under the JSON, setting the value as the
name of the field it has the dependency on (name property in the field definition).
This will apply the following logic:
If the field you have the condition by is a boolean field, the visibility will be directly controlled by the checked status of that field
If the dependent field is a choices field, the field will be visible whenever an option is selected. If you want to configure the field so that it only gets visible by a single value of the field’s dropdown, you can add the
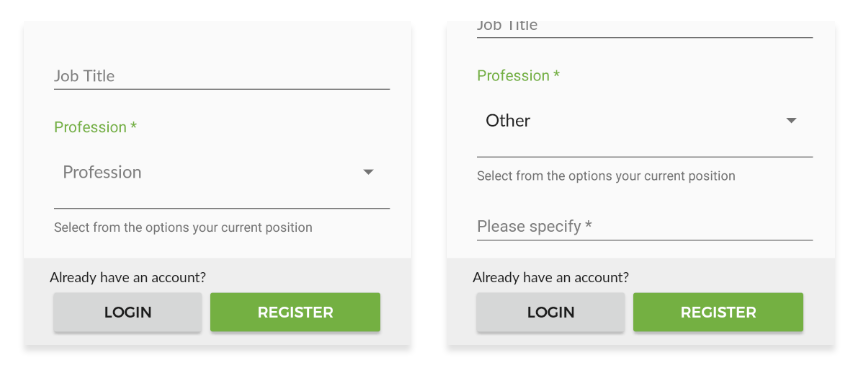
visible_byvalueproperty in the field definition, referencing the id of that collection item. Let’s see it with an example:{ "fields": [ { "name":"profession", "label":"Profession", "order":1, "required":true, "helper_text":"Select from the options your current position", "type":"choices", "collection":"professions" }, { "name":"custom_job", "label":"Please specify", "order":2, "required":true, "visible_byfield":"profession", "visible_byvalue":"other", "type":"str" } ], "collections": [ { "collection_name": "professions", "items":[ {"id": "hew", "value":"Health Extension Worker"}, {"id": "program_manager", "value":"Program manager or implementer"}, {"id": "research", "value":"Researcher"}, {"id": "n_a", "value":"N/A - Not currently working"}, {"id": "other", "value":"Other"} ] } ] }
With this definition, the registration form will show a custom dropdown field
to select the profession, and only in the case where the user selects the
“Other” option the second field will become visible. Also, regarding the
"required" property of the field, this is only checked if the field is
currently visible.
You can also negate a condition, so that a field is visible not when a specific
value is selected, but when the value selected is any other value except from
that one. To do so, add an exclamation mark to the field name in the
visible_byvalue property. For example:
{
        "fields": [
                {
                        "name":"profession",
                        "label":"Profession",
                        "order":1,
                        "required":true,
                        "helper_text":"Select from the options your current position",
                        "type":"choices",
                        "collection":"professions"
                },

                {
                        "name":"job_experience",
                        "label":"Work experience",
                        "order":2,
                        "required":true,
                        "visible_byfield":"profession",
                        "visible_byvalue":"!other",
                        "type":"str"
                }
        ],
        ...
In this case, the field for “Work experience” will appear when the selected value for the position field is different than “Other”.
Nested choice fields
Regarding the choice fields, there are some use cases where there is the need
to be able to show a different subset of choices depending on the value of
another field, for example, a county-district hierarchy. This is done adding
a property named collection_byfield in the field definition under the JSON,
setting the value as the name of the field it has the dependency on.
Make sure that the field you reference is a choices type field, and then,
for every option of that field’s collection, there should be another collection
defined with the collection_name set as the id of that field.
Let’s see it with an example:
{
        "fields": [
                {
                        "name":"parent",
                        "label":"Parent field",
                        "order":1,
                        "required":true,
                        "type":"choices",
                        "collection":"parent"
                },

                {
                        "name":"nested",
                        "label":"Child field",
                        "order":2,
                        "required":true,
                        "visible_byfield":"parent",
                        "collection_byfield":"parent",
                        "type":"choices"
                }
        ],

        "collections": [
            {
              "collection_name": "parent",
              "items":[
                {"id": "first_child", "value":"Parent #1"},
                {"id": "second_child", "value":"Parent #2"},
                {"id": "third_child", "value":"Parent #3"}
              ]
            },

            {
              "collection_name": "first_child",
              "items":[
                {"id": "01", "value":"Parent #1 - Child #1"},
                {"id": "02", "value":"Parent #1 - Child #2"},
                {"id": "03", "value":"Parent #1 - Child #3"}
              ]
            },

            {
              "collection_name": "second_child",
              "items":[
                {"id": "01", "value":"Parent #2 - Child #1"},
                {"id": "02", "value":"Parent #2 - Child #2"},
                {"id": "03", "value":"Parent #2 - Child #3"}
              ]
            },

            {
              "collection_name": "third_child",
              "items":[
                {"id": "01", "value":"Parent #3 - Child #1"},
                {"id": "02", "value":"Parent #3 - Child #2"},
                {"id": "03", "value":"Parent #3 - Child #3"}
              ]
            }
        ]
}
Stepped registration form
To provide a better user experience, the registration screen can be split in different steps with a single explanation. This will allow you also to create different registration paths based on the values the user has filled so far.
This is configured also in the custom_fields.json file, under a property
named "register_steps". It is an array where you need to configure for
each step the following values:
order: integer. The order of this step. If there is more than one path there can be more than one step defined with the same order, but be aware of making the conditional definitions so that they arehelper_text: the description that will appear at the top of the screenconditional_byfield: if this step is conditional, the field it depends upon. The same rules as the basic conditional fields apply.conditional_byvalue: the specific value for the conditionfields: an array with the field’s identifiers to show in this step. To include the default fields in the registration form, this are their identifiers (they are self explanatory):username,email,password,passwordagain,first_name,last_name,job_title,organisation,phoneno.
Mandatory fields
To be able to easily configured the registration form, you can also use the
custom_fields.json file to define which of the profile fields (the fields
that are included by default in the app implementation) are mandatory.
This is done using a property named required_fields, that it’s an array with
the field’s identifiers. The possible values to add are: email, phoneno,
job_title and organisation.
So, for example, if you’d want to configure your registration form so the email and phone number fields are required, you would add the next definition to the JSON file:
"required_fields": ["email", "phoneno"],